


Bird Lessons
A Messy Classroom provides resources for teachers and parents to use for free. All that we ask is that you do not share the PDFs and instead share the link to the website for people to download resources themselves. This helps keep the website running and new resources being created.
Amazing Bird Worksheets


Below are free downloadable documents to help your student or child learn more about birds.
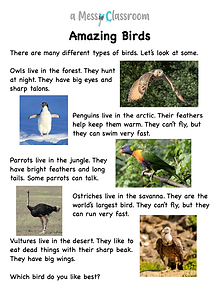
This unit begins with a simple text about birds. The short passage discusses five different birds including: owls, penguins, parrots, ostriches, and vultures. For each bird, it explains the biome in which it lives as well as some fun facts about the birds. The text repeats high frequency words but also introduces some new vocabulary. The passage uses the words forest, arctic, jungle, savanna, and desert. These words are further supported with the vocabulary activities. It also introduces bird body parts such as talons, wings, beaks, eyes, feathers and tails. I have made another text that reinforces those words. This text is a good read for a well-read kindergarten student or a first grader. If your student it not able to read it on their own, it can make a for a fun reading activity to do together.
To accompany the Amazing Birds text is an activity about biomes. For this activity, discuss the different biomes with your student and give many examples. Reread the Amazing Birds text, and focus on the biomes in each picture. Then have your student complete this worksheet matching the biomes with the correct bird.
To finish off the activites with this text, there is a comparing worksheet. Students are prompted to compare an owl and a penguin. Some things they can discuss are the biomes, flight, and habits. They can also compare body parts. For comparing, it is best for them to find a similarity first and then compare what is different about that similarity. For example, Both birds have wings. Penguines can't fly and use their wings to help them swim. Owls use their wings to fly. This way of comparing helps the comparision to have more meaning and will help them as future learners.
If your learner is a writer, there is also a nice writing worksheet for them. This was left without a prompt so that it can more easily fit a variety of lesson focuses, learning levels, and ages. Some possible prompts for your young writer are:
1. You discovered a new bird! Name the bird. Explain where the bird lives and some of its features.
2. Reread about bird parts. Explain in your own words the different parts of birds and what they are used for.
3. Color the picture of the bird. Explain why you chose those colors.


Bird Vocabulary


Vocabulary is an important part of building literacy and understanding. For this unit, there are eight key vocabulary words designed to help students learn more about birds and adjective use. Each of these vocabulary words are used multiple times in the unit in order to reinforce them.
It is good to use multiple parts of our brain when learning new vocabulary, so one of the vocabulary activities includes writing the vocabulary word and having the student draw a picture to help them remember what it means. Make sure the student is generating their own picture, not copying one.
Some other vocabulary activites include:
1. Hide the word: For this activity, print the vocabulary cards and hide the picture/definition part around the room. Then hold up a word, have kid hunt around the room to find the matching definition. For large classes, break the group into two groups and have them send just one or two at a time to do the searching. Kids of all ages love this game.
2. Read and race: For this activity, have the words on one end of a hallway or if the weather is nice you can do this outside. Have two kids prepare to race (can be done with one kid running trying to beat their previous time), hold up a definition card. The student reads the card and runs to go find the match.
3. Pictionary: For this activity, shuffle the word cards. Have students draw to explain the meaning and others can guess what card it is.
For more vocabulary ideas, read my blog entry all about engaging vocabulary activities.


Bird Body Parts
Below are free downloadable documents to help your student or child learn more about birds.
The second text for this unit describes the body parts of a bird. For each body part, it discusses how it is used and how they can be different for different types of birds. To help students better understand how pictures support text, this passage has an interactive component. Students can cut out the photos of the body parts at the bottom of the page and paste them next to the correct paragraph. Have the student explain how that photo helps to make the information in the paragraph more accessible. This text is a good read for a well-read kindergarten student or a first grader. If your student it not able to read it on their own, it can make a for a fun reading activity to do together.
After students read about the different body parts, they can complete this labeling worksheet. Higher level students can write the words whereas lower level students can simply cut out the words and paste them next to the correct body part. If a student needs an extra challenge, ask them to compare human body parts with bird body parts on the back of the paper.
It is important for students to be able to recognize parts of speech so they can use them correctly and with purpose in their own writing. Both texts in this unit make liberal use of adjectives. Reread both texts and discuss the adjectives with your learner. Half of the chosen focus words for this unit are adjectives as well. Once students have a good understanding of adjectives, have them complete this worksheet. Students can read each sentence and circle the adjectives. Then they can write their own sentence about birds using at least one adjective. If students need an extra challenge, have them try to use more than one adjective. If they need assistance, give them the sentnce starter, "Birds are _________."
If your learner is a writer, there is also a nice writing worksheet for them. This was left without a prompt so that it can more easily fit a variety of lesson focuses, learning levels, and ages. Some possible prompts for your young writer are:
1. You discovered a new bird! Name the bird. Explain where the bird lives and some of its features.
2. Reread about bird parts. Explain in your own words the different parts of birds and what they are used for.
3. Color the picture of the bird. Explain why you chose those colors.


Spelling and phonics are an important part of balanced literacy. This unit focuses on birds, so students are reading the word bird frequently. As they read, they may have noticed that bird does not make the typical short i sound like in "igloo" nor does it make a long i sound like in "icecream." Bird follows the ir spelling pattern which is what we call an r-controlled vowel. The r changes the sound of the i. In these spelling activities, students can practice with some other words that have the same r-controlled i sound. For some students, you might want to just focus on words with an initial letter sound of B, but for students able to read the texts independently, these spelling words should be a nice challenge for them.
For students needing a different spelling list, here is a blank version of the same activities. For students focusing on initial b sound, you can have them write the following word list: bird, beak, beat, bake, bike, back, buck, book, bed, bat. More advanced students might be able to spell the vocabulary words or can work on a more difficult spelling pattern.
The first spelling practice activity is a simple one, just write each word three times each. Make sure students are saying the word as they write and trying to write it without looking. One thing they can do is say the word, spell the word, cover the word, then try to write it. There are many fun activities you can do to make this more physical and interactive. For this worksheet, students just need to write the words three times each. They can do that with pens, markers, gel glitter, whatever they like.
The next activity incorporates drawing into the phonics practice. Students should hide their spelling words in a picture they drew. They can then have another person try to find the words. This does have them only writing the word one time, but requires more of a focus on each letter since they have to think about the shape of the letters when hiding them in the drawing.
The third activity is called Rainbow Write, students can practice again with repeatedly writing the words but should use different colors. The instructions say to write each word in three different colors. This means write the word in green, then write it in organge, then write it in pink, or whatever the chosen colors are. However, I allow students to do this activity in a variety of ways. Some want to write each letter a different color, some want to stick with one color for a word and then switch colors for the next word, the important thing here is that they read the word as they do it and practice spelling it.
The fourth activity is what I call Fancy Spelling. They can make their spelling words with creative lettering. This can include cursive for the less artistic kids. Some might chose to make block letters or bubble letters. But some kids really enjoy this and make each word it's own special design. While the latter is preferable, I accept any of them so long as they are focusing on the shapes of the letters. If a students just writes their normal writing for this, I would return it because for this activity I am looking for them to really focus on the letters in the word.
The final spelling activity helps to reinforce the spelling pattern by having students focus on the consonants and vowels that make the word. Learners should write vowels in blue and consonants in red. I usually accept any colors and just have students make me a key. The important thing with this activity is that kids are focusing on the relationship between the consonants and vowels in the words.
These activities were chosen because they help students practice in different ways with the words. Some are focused on rote memorization, while others help students visualize the letters in the word and make connections. However, if these don't work for your learner, there are many other ways to reinforce phonics patterns in students.
Bird Models

After learning all about the anatomy of birds, your learner might be keen to make an anatomically correct bird model! Some possible ways to do it are with polymer clay, which I find to be easier to use and allows for more detail than air dry clay. Polymer clay will not dry out but will get a bit harder if left untouched for a while. The heat from your hands can soften it again if you need to fix a mistake. Once the bird is to your child's liking, you can bake it according to the directions. This will completely harden your student's creation.
Another option is air dry clay which is cheaper but does not allow for as much detail. You can paint the clay after it's hardened to add more detail to your creation.
For a super realisitc bird, consider using paper mâché and fake feathers to make a model bird that could fool your neighbors.
However you choose to make the model, make sure to reinforce the vocabulary from the unit as you create your bird.


Get Messy!
Incorporate some hands-on learning with more bird related activities. Dress your learner up as an explorer and go on a bird watching exhibition. There are many free online bird watching resources, but you can also use this time to further interest your child in reading with a bird watching book. You can get some binoculars to make sure the birds are in clear focus as you identify the feathery friends in your area. Have fun learning!


